
Here is a list of things I like:
Birthdays
Siblings
Family dinners
Rain
Cake
Suprises
Well, tonight had all of these things. And more.
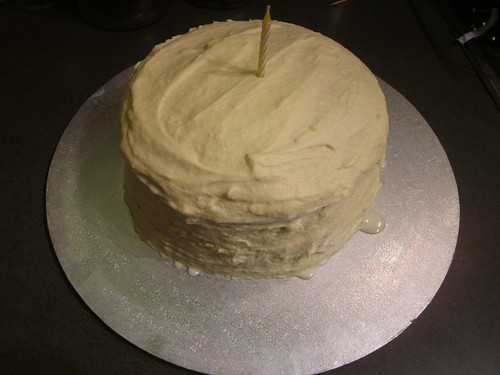
Tonight was my little sisters 16th birthday. That's a pretty important age. I remember when I turned 16, but that's another story for another day. Because this story is all about cake, and sisters who like cake.
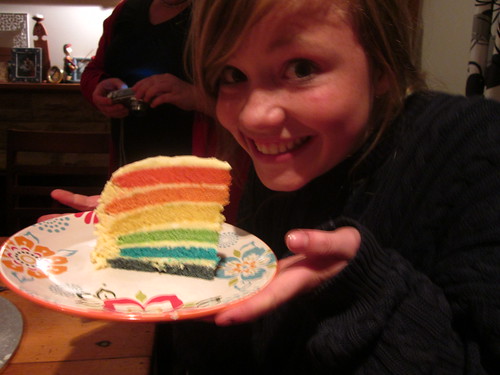
That's my sister there. And that is a slice of the cake. Gotcha! I bet you weren't expecting that!
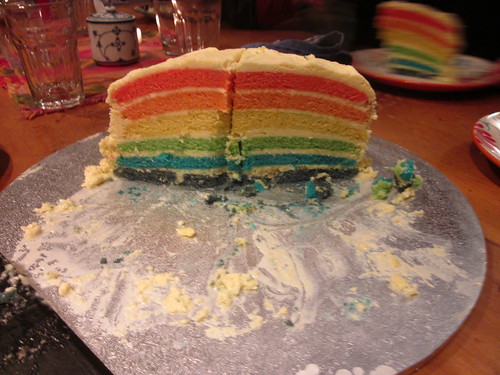
This cake was pretty epic. It took me a week of planning and two days of mixing and baking, but I got there in the end. And I think it was totally worth it. Don't you? If you've got an important sister or friend in your life, and they have an important birthday coming up, why don't you surprise them with a rainbow cake? It will brighten up their rainy birthday and everyone will think you're amazing, that much I promise you.
Rainbow Birthday Cake.
Adapted from Love and Olive Oil.
As I said, this was pretty time consuming. Mainly because I only had one cake tin and I had to bake each layer individually. I wouldn't call this an everyday cake, not by any means. But if you've got a special occasion, it's probably worth it. The icing was a bit much though. I had about a cup of icing left over, and I originally was going to keep it for cupcakes, but I threw it out because I didn't ever want to look at it again. The icing was a lot of effort for something that I didn't think was particularly good. For starters, I don't really like white chocolate, it doesn't do anything for me. And for seconders, it had too many things in it, making it expensive and not really worth it for what you get. If I made this again, I think I would make a cream cheese icing, or something a bit more tasty. But if you really like white chocolate - I mean, if you're really all about it - then it's probably worth it. The icing does set hard though, which is really good if you have to run from the car to the house in the rain and you don't want your icing getting all messed up.
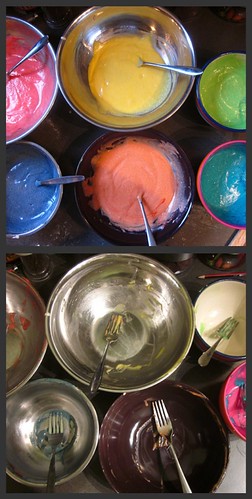
Also, the original recipe called for gel colours, but I couldn't find these, so I just used regular food dye and it worked fine. The icing originally called for nearly a kilo of butter, but I ended up using about 200g less, because I didn't think it needed it and I was right. The icing also called for 'sugar'. It took me a while to decide what type of sugar she meant: icing, white, castor; but I went with plain white sugar and it worked fine.
For Cake:
2 1/4 cups cake flour
1 cup whole milk
6 egg whites, at room temperature
2 tsps almond extract
1 tsp vanilla extract
1 3/4 cups white sugar
4 tsps baking powder
1 tsp table salt
170g unsalted butter, softened
food dye.
Preheat oven to 180C. Grease and line a 20cm (or smaller) springform cake pan.
For icing:
2 1/2 cups white sugar
10 egg whites
700g unsalted butter, chopped, softened
2 tsps vanilla extract
500g white chocolate, melted and cooled
Put sugar and egg whites in a large heatproof bowl over a pan of simmering water. Whisk constantly until sugar is dissolved and mixture registers 140F on an instant-read thermometer.
2 1/4 cups cake flour
1 cup whole milk
6 egg whites, at room temperature
2 tsps almond extract
1 tsp vanilla extract
1 3/4 cups white sugar
4 tsps baking powder
1 tsp table salt
170g unsalted butter, softened
food dye.
Preheat oven to 180C. Grease and line a 20cm (or smaller) springform cake pan.
Pour milk, egg whites, and extracts into a bowl and mix. Mix flour, sugar, baking powder, and salt in a large bowl and beat at high speed. Add butter. Beat at slow speed until mixture resembles crumbs. Add all but 1/2 cup of milk mixture to crumbs and beat at high speed for 1 1/2 minutes. Add remaining milk mixture and beat 30 seconds more. Stop mixer and scrape sides of bowl. Return mixer to high speed and beat 20 seconds longer.
Divide batter between six bowls. Add enough food dye to each bowl, whisking until you get the right shade. Pour one colour batter into the cake pan. Transfer to oven and bake until cake tester comes out clean, about 9-10 minutes. Let cakes rest in pans for 3 minutes. Invert onto wire rack. Repeat with remaining colours.
Allow each layer to cool completely.
For icing:
2 1/2 cups white sugar
10 egg whites
700g unsalted butter, chopped, softened
2 tsps vanilla extract
500g white chocolate, melted and cooled
Put sugar and egg whites in a large heatproof bowl over a pan of simmering water. Whisk constantly until sugar is dissolved and mixture registers 140F on an instant-read thermometer.
Take off heat. Beat on medium-high speed until fluffy and cooled, about 10 minutes. Continue beating until stiff peaks form. Reduce speed to medium-low; add butter by the spoonful, beating well after each addition. Add vanilla and white chocolate.
To assemble cake:
Place four strips of baking paper around outside of a cake plate. Place the purple layer on the plate. Scoop filling over the first layer and spread with a spatula so it extends just beyond edges. Repeat process with blue, green, yellow, and orange layers.
Place the remaining red layer on top, bottom-side up. Using a spatula, cover the top and sides with a layer of icing so that the colours cannot be seen. Gently pull out the layers of baking paper. Refrigerate until set, about 30 minutes.
No comments:
Post a Comment